Saturday 23 April 2016

Final evaluation

Final evaluation 

For this project the theme was Gothic Horror; I was excited about working with this concept because it sparked creative ideas involving special effects makeup products. This is something I am interested in an have chosen as my second year choice. For the first part of the project I based my makeup character on Dorian Gray by Oscar Wilde. This involved me creating a makeup and hair design based on the book and bring it to life for tv and film. I then had to recreate the look twice to show my skills in continuity. I didn't find this too challenging as I had a relaxed model and I made sure I was prepared; I had images of the design and my face chart and hair chart, I was happy overall even though I noticed small differences in the design. Overall I enjoyed this part of the project because it allowed me to work with a male model for a change, and this has helped me to develop confidence skills in working on/with a range of people. I used latex in this makeup design to change the model into an older looking man, I enjoyed this because the outcome is always something that interests me and the model. I enjoy using special effects products because when used in the right way, they change the appearance of the model more drastically than using make-up alone.   

The second part of the project was more creative, I was able to create two makeup and hair designs for AHS tv series; Claudia and quentin. During my experimentations with products I found new ways to use Collodion, if layered onto the skin it creates a very realistic looking old scar, I used this technique on Claudia. I enjoyed using this product because I was confident in using it, and I think it creates an effective design. Something I would like to develop further and experiment with is the technique in using 3D non makeup products on the face. For example I have used bandage material on my character Quentin and I would like to develop this further by using more interesting products to create a 3D special effects design.    

I believe the most successful part of this project for me was the outcome of my experimentations; I had practiced with different special effects products to find the most effective way of creating a scar. After practicing on myself and on willing models I found using thick layers of collodion over the skin makes it tight and shiny. I found the most difficult part of the project was using bandages as a makeup product for Quentin. After many experimentations with the material I found it hard to find the most effective looking design, I wanted it to look gory but not to just fill the face with blood, I also wanted to use stitching into the design but after practicing with different ways of stitching into bandage I found it too complicated and the outcome did not look how I wanted. 

If I could complete this project again I would spend more time practicing and experimenting with products because, I have found that experimentation leads to new and exciting ways to use a product. I would also have spent more time on the small details in my Quentin design; adding extra blood and blending the edges away as much as possible. To improve my Dorian Gray character I could have spent more time on making the hair as similar as possible, although I used the same products and same size hair tongs the hair was a different texture the second time round.     

Friday 22 April 2016

Experimenting With Prosthetics head

Experimenting With Prosthetics head 


What I used: 

  • Prosthetic head 
  • bandages 
  • Kryolan spirit gum 
  • Kryolan spirit gum remover 
  • Large black button 
  • Large pin 
I have used my practice head to decide the placement and style of bandage I will use during my assessment for my character Quentin. I want to use this as it reflects my voodoo doll inspiration and traditional African Voodoo qualities. 

Final Evaluation draft

Continuity Assessment
The build up to this assessment was less of a nerve racking experience this time, due to the preparation of previous assessments completed. I found that I worked well with the model as it was very relaxed and rehearsed, this helped me to achieve the look I planned for. I think I did well to produce a Dorian Gray character from a book for tv; I have tried to use techniques that I found gave the best effects, example I used latex on his eyes, this gave a wrinkled effect and after practicing the design times before the assessment I was confident in the application. I think I did well to get he right skin base, I used light and dark colours of foundation to get a more 'in depth' look to the face, I also used the dark foundation around the eyes to start off the tired and stressed look, I used super colour; blue, black and red on the eye lids and underneath the eye to add to this effect. I darkened the natural lines on the models face and pulled out some of the lines in his forehead. I then use supercolour on the beard and in the hair to make it look aged. 

Overall I am pleased with the outcome of the hair in my design; I based the design on the research I had done and found the most effect way to recreate a Victorian hair style in the tradition curls and ringlets. If I could do it again with improvements I would have coloured the beard less round the top of the hair line to make the colouring look realistic and faded, rather than a harsh line. I would have also painted more of his teeth with tooth enamel and added some liquorish to make his mouth black. I would have also used more latex and raging products to increase the realism of the design. 

I had my set of instructions and continuity pictures for this assessment so I could be sure with applying the makeup and styling the hair to look the same. Overall I was pleased with the outcome of my design because I think, looking back at the continuity pictures, I managed to recreate the look well in terms of continuity. Even though I used the same technique and size curling tongs, the hair style looks slightly different; the size of the curls is slightly smaller and flatter, there is less volume on the hair and the parting is less neat. I put the parting in the same place but think I used less product, this made the smaller hairs stand up instead of smoothing down. Overall I was pleased with the design because I used the same products and the same techniques and I managed to recreate the design I wanted. 

Claudia
I am happy with the outcome of my design, the makeup worked well on the models skin and I matched the colours to my planning and ideas well. I am pleased that I have managed to take two sets of images, some with eye drops and some without to get the full effect of before and after. I was able to use the model I had planned to use and she worked well within the look I was creating. I made her skin pale and darkened her cheekbones, contour areas; including the forehead and neck and added blood and scars to her lower neck. I then used eye drops in and around the eyes the give the effect of crying blood. I used the hat to enable the character to fit in with AHS Coven, and I think this was well executed. To improve my design I could add more scars using collodion as these were the most effective, and add some more cuts using tuplast for a range of skills shown. I finished this design in 2 hours, staring with the hair and finishing with the makeup.

Quentin
I was happy with the outcome of my makeup design, and even though I found it hard to use the material with some of the makeup products, I spent a lot of time experimenting with using the bandage material to get the most effective look. I enjoy using the special effects products because I am able to be more creative with my ideas and the application. I spent the time to practice the design on myself and practice on my face charts to put my ideas into practice, this made the assessment day relaxed because I was focused on the design and had prepared. The makeup and hair took approximately 1 hour and a half, I was pleased with this because I didn't have to rush or make extra time. If I could do this design again with improvements I would use more blood to show the freshness if the developing skin, I would also have used more supercolour tones around the eye to show tiredness and added extra skin to the models upper chest. 

Quentin - Final Image 2

Quentin 

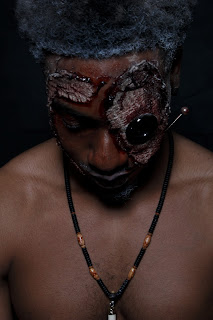
I have based this look on the Voodoo people in AHS Coven, I have created the character as Claudia's imaginary boyfriend.

This look comes from the African Voodoo background that is described in the series, I have created this character to look like he his turning into a voodoo doll. I have used real bandage material to create the new skin that is forming, this idea is taken from my inspirational word 'bandages'.    

What I used:
  • Kryolan foundation palette 
  • Kryolan supercolour palette 
  • makeup brushes 
  • makeup sponges
  • stipple sponge 
  • Bloodymarvelous thick blood 
  • bloodymarvelous wound filler - scab 
  • bandages 
  • pin 
  • large black button 
  • Kryolan spirit gum 
  • Kryolan spirit gum remover 
  • fullers earth 


Conclusion
I was happy with the outcome of my makeup design, and even though I found it hard to use the material with some of the makeup products, I spent a lot of time experimenting with using the bandage material to get the most effective look. I enjoy using the special effects products because I am able to be more creative with my ideas and the application. I spent the time to practice the design on myself and practice on my face charts to put my ideas into practice, this made the assessment day relaxed because I was focused on the design and had prepared. The makeup and hair took approximately 1 hour and a half, I was pleased with this because I didn't have to rush or make extra time. If I could do this design again with improvements I would use more blood to show the freshness if the developing skin, I would also have used more supercolour tones around the eye to show tiredness and added extra skin to the models upper chest. 
Final Images


Monday 18 April 2016

Claudia and Quentin Moodboards

Claudia and Quentin Moodboards 

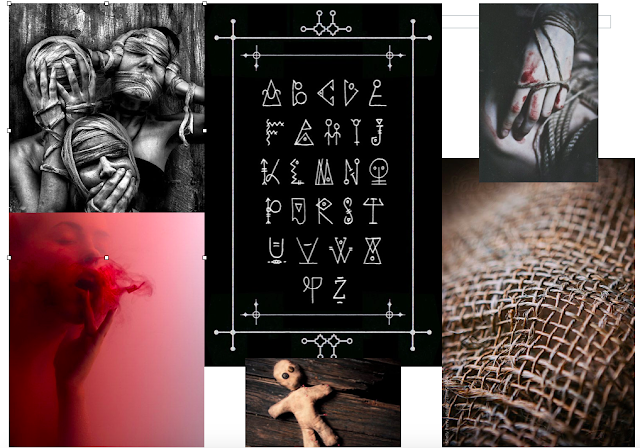
I have created two mood boards for my characters Claudia and Quentin, this is to illustrate my ideas better and show my design process and ideas for mood and colour. I have chosen some images that represent the chosen word of; 'veiled' for Claudia, and 'bandages' for Quentin. 

Claudia 

This mood board reflects my design process for my character Claudia, I have used images for blood and the middle image to represent her cuts and scars. I have also used images to reflect my inspiring word and others to make the mood board have a dark and sinister feel.   


Quentin

For this mood board I have used images that represent the voodoo culture and religion, I have used images to show the pain and anguish caused by Claudia and inflicted onto Quentin. I have tried to set the scene for my design and the character.  


Sunday 17 April 2016

Pins and Buttons

Pins and Buttons

What I will use:
  • bandages 
  • two large pins 
  • button
  • spirit gum 
  • spirit gum remover 
The image below shows the bandages, large pins and button I will use and practice with for my final design on model Liam. 


http://www.livescience.com/40803-voodoo-facts.html, viewed 14.04.16 Digital Image
http://www.123rf.com/stock-photo/voodoo.html, viewed 14.04.16, Digital Image


The African Bocio

The classic voodoo doll originates from many different cultures, and they differ from each one. Voodoo dolls are considered something of evil magic; by sticking pins into them and inflicting pain onto people who don't do what we want. The original voodoo dolls where used for good spells, for health and happiness, but voodoo magic has become associated with evil for its close partnership with the dead. I will be basing my idea of the voodoo doll on the original African Voodoo magic. Slaves being carried from Africa would bring their dolls (African Bocio's) with them for good luck and other religious reasons; health and safety. The classic pin idea came later; I will also involve this into my ideas for my makeup design. African Voodoo became a challenging religion as it was considered a slave religion.      

Saturday 16 April 2016

Claudia - Final image 1

Claudia 

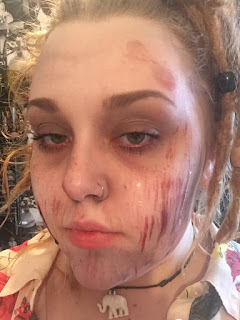
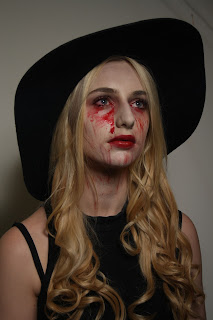
I have based Claudia's look on her disorder and personality, I wanted to show her sadness and loneliness through the makeup design. Her scars and cuts show her pain though self harm and her eyes and cheek bones are darkened and more defined. As Claudia has an imaginary boyfriend; I wanted to show some of her passion and desire for someone to care for by curling her hair into goldilocks style curls and waves, the inspiration for this came for the hair style of one of the other witches who star in AHS Coven. She has light blonde highlighted hair in loose waves, this reflects her free spirit and kind natured personality. 

Below are my two chosen face charts; I have selected two that have the same makeup style, I will be using the same makeup products except for the second one I will be using blood eye drops. I have previously asked the model if she is okay with eye drops and I have tested them on her and myself, but I made two face charts for security. 

What I used: 
  • Kryolan foundation 
  • Kryolan concealer
  • Illamasqua powder 
  • Mac eye shadow palette 
  • Kryolan Collodion 
  • Kryolan tuplast 
  • Makeup brushes 
  • Stipple sponge 
  • Bloodymarvelous Thick Blood
  • Kryolan blood eye drops 
  • MUA red lipstick
  • Kryolan Supercolour palette   
  • Kryolan satin Primer
  • Illamasqua white base  
  • Fullers earth 
  • Mac Gel
  • Rimmel lipliner pink and red tones 1-5
  • Barrier foam 
I first assessed the models skin for any contraindications and prepped the skin using cleanser, toner and moisturiser, I then applied a satin based primer for added glow to the skin. I used foundation and white base on the face, neck, ears and upper chest, I added setting powder and darkened the cheekbones, forehead, neck, nose and temples with mac eye shadow, with brown and grey. This was to darken the face and to make the character look worn down and weak. I darkened her eyes with eye shadow and built on the colour using colours from the super colour palette, I used blue, red and black to give a tired eye effect. I slightly darkened the eye brows and used mac gel to shape them.

 Once the base was finished I applied small amounts of barrier foam to the areas that I ill apply collodion. I then used pink Rimmel pencil to on a scar on either side of the models face, I then went over the lines with collodion in 5 layers. This created a pink scar that looked effective and old. I also used tuplast on the bottom of the models chin, and then used large and small stipple sponges to crate the small scratches on the lower face and neck. I added more smaller scars to the face using blood and pencil. I then used lipstick and blood on the lips o gove them a shine and dark colour. 

I used curing tongs on the models hair, about half ay up an then ends. I left the curls in sections and added hairspray and fullers earth, this was to make the character look dusty from staying in all the time due to her disorder. I Then added the hat to make the character become one of the witches. 


The bright light used in these images doesn't show the full effect of the makeup, her skin is too bright and some of the detail is lost. 


I am pleased with the scars I was able to create using Collodion; I added the product over a line drawn in red or pink pencil, and layered the collodion in5 layers. 


Conclusion
I am happy with the outcome of my design, the makeup worked well on the models skin and I matched the colours to my planning and ideas well. I am pleased that I have managed to take two sets of images, some with eye drops and some without to get the full effect of before and after. I was able to use the model I had planned to use and she worked well within the look I was creating. I made her skin pale and darkened her cheekbones, contour areas; including the forehead and neck and added blood and scars to her lower neck. I then used eye drops in and around the eyes the give the effect of crying blood. I used the hat to enable the character to fit in with AHS Coven, and I think this was well executed. To improve my design I could add more scars using collodion as these were the most effective, and add some more cuts using tuplast for a range of skills shown. I finished this design in 2 hours, staring with the hair and finishing with the makeup.  


Friday 15 April 2016

Consultation notes - Ashleigh

Consultation notes

Name:
Ashleigh    

Age:
19

Hair type, coloured, natural or dyed:
blonde hair, straight and smooth  

Skin tone:
light  

Skin type:
Dry to normal skin 

Eye Colour and shape:
Even eyes, blue/green 

Allergies/Medication:
None 

Contraindication: 
No contraindications 

Notes:
Normal to dry skin, no actions needed to be taken, use cleanser, toner and moisturiser on skin before any application of makeup, concentrating on moisturising the skin before. 

Consultation notes - Liam

Consultation notes

Name:
Liam    

Age:
22

Hair type, coloured, natural or dyed:
dark brown hair, afro texture, short   

Skin tone:
medium/dark  

Skin type:
Dry to normal skin 

Eye Colour and shape:
Even eyes, brown  

Allergies/Medication:
None 

Contraindication: 
No contraindications 

Notes:
Normal to dry skin, no actions needed to be taken, use cleanser, toner and moisturiser on skin before any application of makeup, concentrating on moisturising the skin before. 

Tuesday 12 April 2016

Tribal Neckless, eye blood and dry shampoo for assessment - Quentin

Tribal Neckless


 I have selected three neckless's and two decorations in the style of African Tribal, this is for my Quentin character as he originated from Africa. I will test each neckless on the model during the practice and the assessment to find the most effective style and colour if neckless.  

Dry shampoo


I will use the dry shampoo over the hair of the model to make him appear older, this will be due to the grey/white colour the  top and ends of the hair. 

Eye Blood


I will use the eye blood particularly in the eye that is coloured mostly by bandages, I will also add a small amount the other eye and let it dry down, this is to add effect the character and make his appear more threatening and scary. The image above shows a demonstration of a small drop into the eye.  

Quentin developed

Quentin Developed 

After much practicing and experimenting with materials and special effects, I have developed my ideas so that Quentin's design looks the most effective and realistic. This means I have developed the stitching into bandage material idea into using the bandage as if the skin is moulding into it. After experimenting with thread, string, moveable wire and thin shoe lace to use as stitches in the bandage I have found this doesn't look as effective than if I use selected pieces of bandage, stuck to the face using spirit gum. My Idea is best illustrated through my chosen face chart shown below. I have used thin bandage material to the face and blended the edges with wound filler, blood and colours from the Kryolan Super colour palette, I have also darkened the area around the eye and will make a hole in the piece that covers the eye, I will darken inside the eye and darken he lips to make them appear dry. I will keep the theme of bandage going down to the models neck and chest area, the look will be finished with a tribal necklace for effect and I will add some dry shampoo to the hair, this will make the character appear older. 


Sunday 10 April 2016

CGI

CGI

What is CGI?

Computer-generated imagery (CGI for short) is the application of computer graphics to create or contribute to images in art, printed media, video games, films, television programs, shorts, commercials, videos, and simulators. The visual scenes may be dynamic or static, and may be two-dimensional (2D), though the term "CGI" is most commonly used to refer to 3D computer graphics used for creating scenes or special effects in films and television. Additionally, the use of 2D CGI is often mistakenly referred to as "traditional animation", most often in the case when dedicated animation software such as Adobe Flash or Toon Boomis not used and/or the CGI is hand drawn using (a) tablet(s) and/or mouse. https://en.wikipedia.org/wiki/Computer-generated_imagery

https://www.quora.com/How-did-they-film-create-Harvey-Dents-half-burnt-face-in-The-Dark-Knight, viewed 10.04.16

http://screenrant.com/gotham-tv-show-harvey-dent-two-face-actor, viewed 10.04.16

For films like Batman where millions of pounds are spent creating an action packed CGI filled film, makeup is sometimes pushed to the side. It saddens me that while I am learning about makeup and special effects, the special effects that are used in this film weren't created using makeup. Some types of special effects makeup would involve using prosthetic moulds and would cost a lot of money and take a lot of time; this may be a modern way of saving time and money on a big film like this one. Although I appreciate the quality of the graphics and the artistry of the CGI, it would be very impressive if the design was makeup. In the future many films way stop using special effects makeup and use CGI, putting me out of my dream job. Using this is also another way of making sure the design looks the same every time and is of the same excellent quality, makeup will need a lot more practice and preparation which again is time and money.  

Friday 8 April 2016

Experimentation for Claudia and final face chart

Claudia 

What I used:
  • Kryolan foundation palette 
  • Illamasqua white base
  • mac eye shadow palette 
  • makeup brushes 
  • Kryolan Collodium 
  • Kryolan Tuplast 
  • Bloodymarvelous thick Blood 
  • stipple sponge 
  • Rimmel mascara
  • Kryolan barrier foam