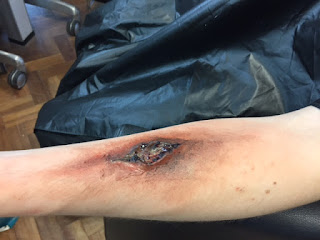
Scarring; using gelatine moulds
Am introduction to prosthetics
What I used:
What I used:
- gelatine mould
- makeup brushes
- super colour
- glycerine
- cotton buds
- cleanser
- witch hazel
- specific prosthetic glue; pros-aide, which is a contact glue
- pro clan oil, the glue will not come off with any other product
Heath and safety:
- ensure any contraindications are reviewed
- be careful when removing the product, and use the glue oil remover on the skin to get any excess glue off
- use talc powder on moulds to stop them sticking
- press the gelatine mould on the skin to get rid of any air bubbles
- wipe away excess glue using pro clean oil
I decided to make an old/open wound, and chose a gelatine mould of a scar that was quite big, I wanted to see the effects of more good colouring. I used the glue on both the arm of the model and the mould, and once completely clear I then stuck the two together. Waiting for it to dry properly ensures a better stick and a smoother outline. I then used oil to remove any excess glue, and applied witch hazel to the edges to smooth them onto the skin. I applied powder to ensure the stick had gone, and a red and dark brown colour to the area around the wound. I used darker colours on the inside to make the wound look old and burnt. I used sponges to spread the colour down the arm to look more realistic.
Shown in these two images, is my development of colour application, I started with a harsh colour outline on the gelatine but with more blending and using the stipple sponge I have blended out the colour and given the makeup a professional finish. I am pleased with the outcome of my design, I think I have managed to produce makeup that looks realistic, I blended the colours until the harsh lines disappeared and added a pus colour to the inside of the cut, I finished with added some glycerine for a shine.


No comments:
Post a Comment